If you are reading this, congratulations—you just got comments back on your manuscript! That means there is still work to do, but you’ve cleared a major milestone. At this stage, your manuscript is probably in one of three categories:
- Rejected with comments
- Considered for acceptance after major revisions
- Considered for acceptance after minor revisions
If you received major or minor revisions, you are really close to the finish line. If you take reviewer recommendations seriously and approach them strategically, you should have little trouble satisfying the comments—even if the list feels intimidating at first.
If your manuscript was rejected, don’t fret. The editor thought your work was interesting enough to send out, and at least one reviewer read it carefully enough to provide feedback. That already means something. A rejection does not automatically mean you should downgrade journals. In some cases, taking reviews seriously and making the changes can make the paper strong enough to submit to an equal—or even better—journal.
Before diving in, keep three principles in mind.
Three rules to remember
1. Make it easy to say yes.
This is the most important rule. A reviewer should be able to glance at your response and immediately feel that you have addressed their concerns throughly. Don’t make them hunt.
2. Choose your battles wisely.
Reviewers carry a lot of weight with editors. Most requests—clarifications, wording changes, figure tweaks, references, minor analysis adjustments—should simply be done. Push back only rarely, and only when it truly matters.
3. Assume responsibility.
Sometimes a reviewer comment reveals that they just misunderstood you. If this happens, don’t just correct the reviewer, but also assume it’s because you weren’t clear enough. A careful reviewer missing your point means a casual reader definitely will do the same. Rather than correcting the reviewer, apologize for the lack of clarity and make a change to ensure future readers don’t make the same mistake.
With that mindset, you’re ready to start.
Step-by-step: how to actually do the revision
Step 1: Skim the comments—then step away
Your first read will probably sting. You’ll see comments that feel rude, suggestions that don’t make sense, and signs the reviewer didn’t fully understand your work. You’ll rarely see compliments. That’s normal.
Skim everything once, then step away for a day. Let the harder comments rattle around in your head while you do something else.
Step 2: Read the comments carefully
After a day or two, reread the reviews more slowly. You’ll be less emotional and better able to separate easy tasks from difficult ones. This is where assuming responsibility helps:
- If they misunderstood, you weren’t clear enough.
- If they missed your point, you didn’t repeat it enough.
- If a figure confused them, it needs better explanation.
By the end of this pass, most comments will feel fair—and solvable.
Step 3: Start with careful bookkeeping
You’ll need to make the suggested changes and prepare a response to the reviewers explaining your changes. That will require some careful book keeping
Create a copy of your manuscript called something like:manuscript_withComments.docx
Now take every reviewer comment and directly attach it to the text it refers to using Word comments. Copy and paste each reviewer comment next to the relevant word, sentence, paragraph, section, or figure, and paste it as a comment bubble.
This does three things:
- Prevents confusion later. Line numbers, page numbers, and paragraphs will change as you edit. Attaching comments ensures you never lose track of what the reviewer meant.
- Creates a checklist. Each comment bubble becomes something you can knock out and delete. Very satisfying.
- Creates momentum. Reviews are daunting. This is an easy, mechanical task that gets you moving.
Once all comments are attached, you’re ready to start revising.
Step 4: Document the reviewer response as you go
Create another new document:Response_to_reviewers.docx
Paste all reviewer comments into this document. Under each one, as you make changes, you will write a direct response explaining exactly what you changed.
This is probably the most important document the reviewer will read. Ideally, a reviewer should be able to recommend acceptance just by reading your response, without needing to reread the entire paper.
For very simple fixes, “Done” or “Corrected” is fine—but only for trivial things like typos or simple word changes
For more complex changes like clarifications, always include the revised text and placeholder line numbers:
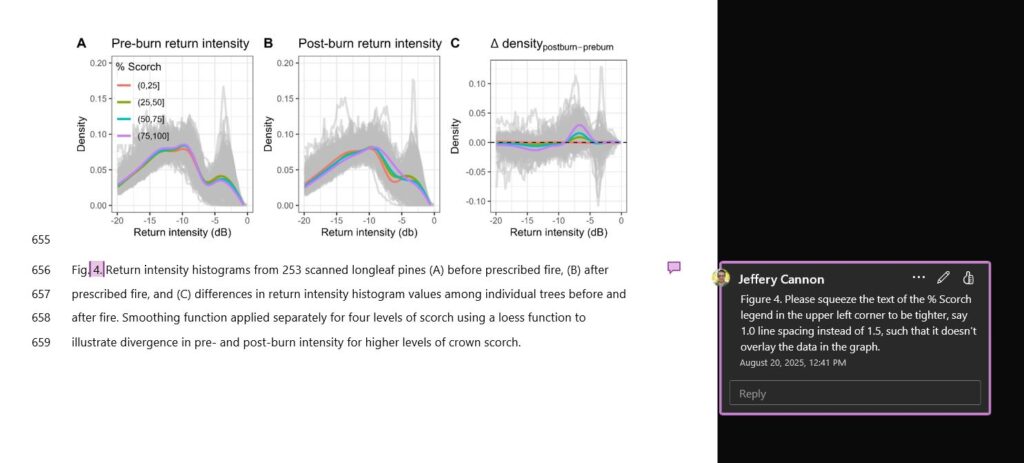
“Good catch—we have clarified the sentence, which now reads: ‘Basal area ranged from 13.4 to 30.6 m²/ha’ (Lines XXX–XXX).”
Never make the reviewer guess what you changed.
Step 5: Start with the easy stuff
Now you are ready to make changes. Create a new document for your revised manuscript:manuscript_v2.docx
You probably haven’t looked at this manuscript in months. Addressing vague or high-level comments cold is hard. Instead, you can begin to engage simply and warm up to the task by tackling easy revisions first:
- Typos and formatting
- Clarifying sentences
- Definitions
- Reference additions
- Minor figure tweaks
For each change you make, document your progress in your Response to reviewers, and then delete each comment bubble as you complete it. This builds momentum and re-familiarizes you with the manuscript.
Step 6: Move on to the harder comments
By now, you have some momentum, you should have re-familiarized yourself with the manuscript, and you’ve had a few days to think about the more difficult problems.
Now its time to tackle comments that require more work: reanalysis, reorganization, new figures, or expanded explanation. Its tempting to be lazy here, especially when reviewers are asking for reorganization or reanalysis. Don’t forget your paper will be much improved if you take the comments to heart.
Remember, you always need to resolve the reviewers concern, but you don’t always need to do exactly what they suggest. In your response, explain what you changed (or didn’t), why, and where it appears in the manuscript (cite line numbers with placeholders for now).
If results, figures, or conclusions change—even slightly—be sure to state that clearly.
When (rarely) refusing a reviewer request
Pushback should be extremely rare. It’s something I try to do only about once per manuscript. Common valid reasons for not making a reviewer suggested change include:
- The request is impossible (e.g., requires data you can’t go back and collect)
- The request is objectively incorrect (e.g., suggesting an statistical analysis that doesn’t apply)
- The request is far outside the scope of the paper (e.g., way off topic)
You must still resolve their concern, even if you don’t make the suggestion. For example, if the reviewer made an incorrect assumption, you should usually add clarifying language to prevent future readers from making the same assumption. (See Rules to Remember: Assume Responsbility).
Step 7: Update placeholder line numbers
Once all revisions are complete, go back to your responses document and replace all placeholder line numbers in your response document. This step is tedious but critical. Accurate references make reviewers’ lives easier—and tired reviewers are more likely to say no.
Step 8: Write a new cover letter
Your revised cover letter should briefly summarize major changes and reassure the editor that the most serious critiques were addressed. Highlight one or two of the biggest issues and explain how you resolved them. Make it easy for the editor to say yes, too.
Final encouragement
If you bend over backwards to make things easy for reviewers, they notice. I’ve followed this process many times and often receive comments like, “Thank you for the thorough and thoughtful revision.” That usually means fast decisions and smooth acceptance.
You’re closer than it feels. Good luck.